
BULL
Oh NO! Not that guy!
Staff Team
Founding Member
U.S. Marine Veteran
Donating Member
HFCOTM & HFCOTY
Wiki Contributor
- Member ID
- #1079
- Messages
- 17,314
- Reactions
- 54,198
- Likes
- 402
- City
- Weld County
- State
- CO
- Country
- United States
- Vehicle
- MY16 M6 Challenger Hellcat
- HFCOTM
- View Images
=========================================================================
Putting new fluid in your brake system seems straight forward, however, depending on your end goals, you may be misled into believing you have "flushed" or "changed" your brake fluid when you may not have actually done so.
This Wiki is for those who wish to do more than simply “freshen” the brake fluid in their brake calipers. It is intended for those who want to completely “purge” or change to a new fluid with as little as possible of the old fluid remaining as is reasonably possible. If your goal is only to "freshen" up your existing fluid, then this document may not be for you
Your reasons for doing this may be that your goal is to completely flush your brake fluid due to age or completely upgrade to a different brake fluid, (i.e., DOT-3 to DOT-4) and you don’t want your new, high-performance brake fluid contaminated with old or lower-performance fluid.
There are other ways to accomplish a complete brake system flush or fluid upgrade, such as evacuating the brake system first and disassembly of brake components and subsequently LESS fluid (and investment) to then refill the brake system, however they require substantially more invasive procedures, time and risk of component damage due to disassembly. Persistent aeration is also a risk. For those willing to invest in more fluid, even at substantial cost, this alternate method eliminates those other risks and nicely accomplishes the goal of a more thorough fluid exchange.
This wiki was developed with the use of a “Power Bleeder”, which is a pneumatically pressurized brake bleeding tool. While it is suspected that the method could potentially work via the traditional “pump and hold” brake bleeding method, it currently has not been investigated for effectiveness or brake fluid volume requirement differences.
Servicing your brakes is a serious matter. This wiki does not presume to teach proper brake servicing technique, procedures or know-how. It is strictly the end-users responsibility to already have this knowledge or to obtain it elsewhere, before utilizing this information. The information here is intended only as academic and to be combined with the appropriate brake servicing expertise to facilitate a more thorough fluid exchange or upgrade. (As before, I really mean this, I’m not just blowing smoke… Improperly servicing brakes can lead to serious property damage and/or personal injury or death!)
=====================================================
TOOLS NEEDED:
Bottle on Left was thought to be clean until compared to the subsequent fluid extracted from inside bleed valve. (Bottles were marked in ounces so that the amount of fluid removed from the Master Cylinder could be determined without having to check multiple times at each bleed valve.)

Then compared to virgin, new brake fluid in bottle, fluid amounts below are based on obtaining fluid that NEARLY matched the virgin fluid in color.

The Power Bleeder that this author used was found to not be reliable in transferring fluid from the Power Bleeder tank to the Master Cylinder without leaking significant amounts of fluid. (Determined on a different vehicle!) Additionally, if a Power Bleeder is not available, the end-user will have to fill the Master Cylinder in the traditional method anyway. As such the Master Cylinder was filled “manually” and then the Power Bleeder was used strictly as a pressure vessel to pressurize the brake system and facilitate a “One-person operation”.
The fluid in the Master Cylinder should never be allowed to run too low, if this is allowed to happen, air will be introduced into the brake system and MUST be removed for a properly operating brake system.
The amount of fluid that can be safely pushed through the Master Cylinder (Ref: Challenger HC) was determined to be 8-10oz when starting with a COMPLETELY FULL Master Cylinder. (Full to the TOP of the Master Cylinder, above the “MAX” fill mark). This author accidentally pushed 12oz through once due to a bleed valve left open, while this did not introduce air into the system, fluid could not be detected in the Master Cylinder, again, this was starting with a COMPLETELY FULL Master Cylinder.
------------------
Using a LARGE (2oz/60ml) syringe and short section of hose, remove as much old brake fluid as possible from the Master Cylinder. Refill Master Cylinder with new desired fluid. ALWAYS take great care to prevent ANY brake fluid from touching any cosmetic surfaces, primarily any exterior painted surfaces as brake fluid will strip away paint leaving a damaged area!
Starting with the Right-Rear brake caliper and then moving progressively around the vehicle as indicated below, bleed the following amounts of fluid evenly and in an alternating fashion from each of the calipers two bleed screws, the following amount of fluid. Keep in mind that with the first caliper, you’re doing the initial flush of the majority of the brake system, from and including the Master Cylinder to the caliper.
Right rear 32+ oz,
Left rear 16-20 oz
Right front 16-20 oz
Left front 16 oz.
----------------------
These amounts were determined by purging or flushing enough brake fluid through a 2016 Challenger Hellcat’s brake system to get fluid that nearly matched NEW fluid as shown in the images above. Note that without the comparison of new fluid in the matching container it had been originally believed that after only a comparatively small amount of fluid (6-8oz), that the fluid was believed to be “NEW”. Even after what seemed to be an excessive amount of fluid, only by directly comparing the bled fluid to the new, virgin fluid, was it apparent that the bled fluid was still “dirty”.
Of Note: The effect of the ABS components and any fluid trapped within them is not considered here.
Also of Note, it would be essentially impossible to get truly 100% virgin brake fluid throughout the system utilizing this method. The affects of wall friction and turbulence in the system will prevent this from happening. It comes down to a matter of economics and time. Each individual will need to decide how much effort and money they are willing to expend to achieve the desired results. I actually flushed the system THREE times. The initial time was to flush the old, dirty fluid out utilizing generic DOT-3 fluid. It was during this effort, where the change in color was obvious, that I was able to determine how much fluid was required to achieve the desired results. The second time I repeated the process utilizing a comparatively low-cost DOT-4 fluid, admittedly with lesser fluid amounts at each corner. The third time was with a premium DOT-4 fluid (Wilwood EXP 600) where I returned to the originally determined amounts. It is my intention to repeat the process either in 12 months or after any extended, competitive driving, whichever happens first.
Putting new fluid in your brake system seems straight forward, however, depending on your end goals, you may be misled into believing you have "flushed" or "changed" your brake fluid when you may not have actually done so.
This Wiki is for those who wish to do more than simply “freshen” the brake fluid in their brake calipers. It is intended for those who want to completely “purge” or change to a new fluid with as little as possible of the old fluid remaining as is reasonably possible. If your goal is only to "freshen" up your existing fluid, then this document may not be for you
Your reasons for doing this may be that your goal is to completely flush your brake fluid due to age or completely upgrade to a different brake fluid, (i.e., DOT-3 to DOT-4) and you don’t want your new, high-performance brake fluid contaminated with old or lower-performance fluid.
There are other ways to accomplish a complete brake system flush or fluid upgrade, such as evacuating the brake system first and disassembly of brake components and subsequently LESS fluid (and investment) to then refill the brake system, however they require substantially more invasive procedures, time and risk of component damage due to disassembly. Persistent aeration is also a risk. For those willing to invest in more fluid, even at substantial cost, this alternate method eliminates those other risks and nicely accomplishes the goal of a more thorough fluid exchange.
This wiki was developed with the use of a “Power Bleeder”, which is a pneumatically pressurized brake bleeding tool. While it is suspected that the method could potentially work via the traditional “pump and hold” brake bleeding method, it currently has not been investigated for effectiveness or brake fluid volume requirement differences.
Servicing your brakes is a serious matter. This wiki does not presume to teach proper brake servicing technique, procedures or know-how. It is strictly the end-users responsibility to already have this knowledge or to obtain it elsewhere, before utilizing this information. The information here is intended only as academic and to be combined with the appropriate brake servicing expertise to facilitate a more thorough fluid exchange or upgrade. (As before, I really mean this, I’m not just blowing smoke… Improperly servicing brakes can lead to serious property damage and/or personal injury or death!)
=====================================================
TOOLS NEEDED:
- POWER BLEEDER
- 7/16” TUBING WRENCH
- 7/16” 6POINT DEEP-WELL SOCKET
- 2oz/60ml SYRINGE – (CATHETER TIP) (Large-animal Veterinary supply)
- 1 to 2 hours or more depending on whether special tools and/or if an assistant is available. A full “afternoon” of time is recommended…
- Using the Power Bleeder, purge enough brake fluid through each of the brake caliper bleed screws in an alternating fashion to ensure a high percentage of fluid exchange/upgrade.
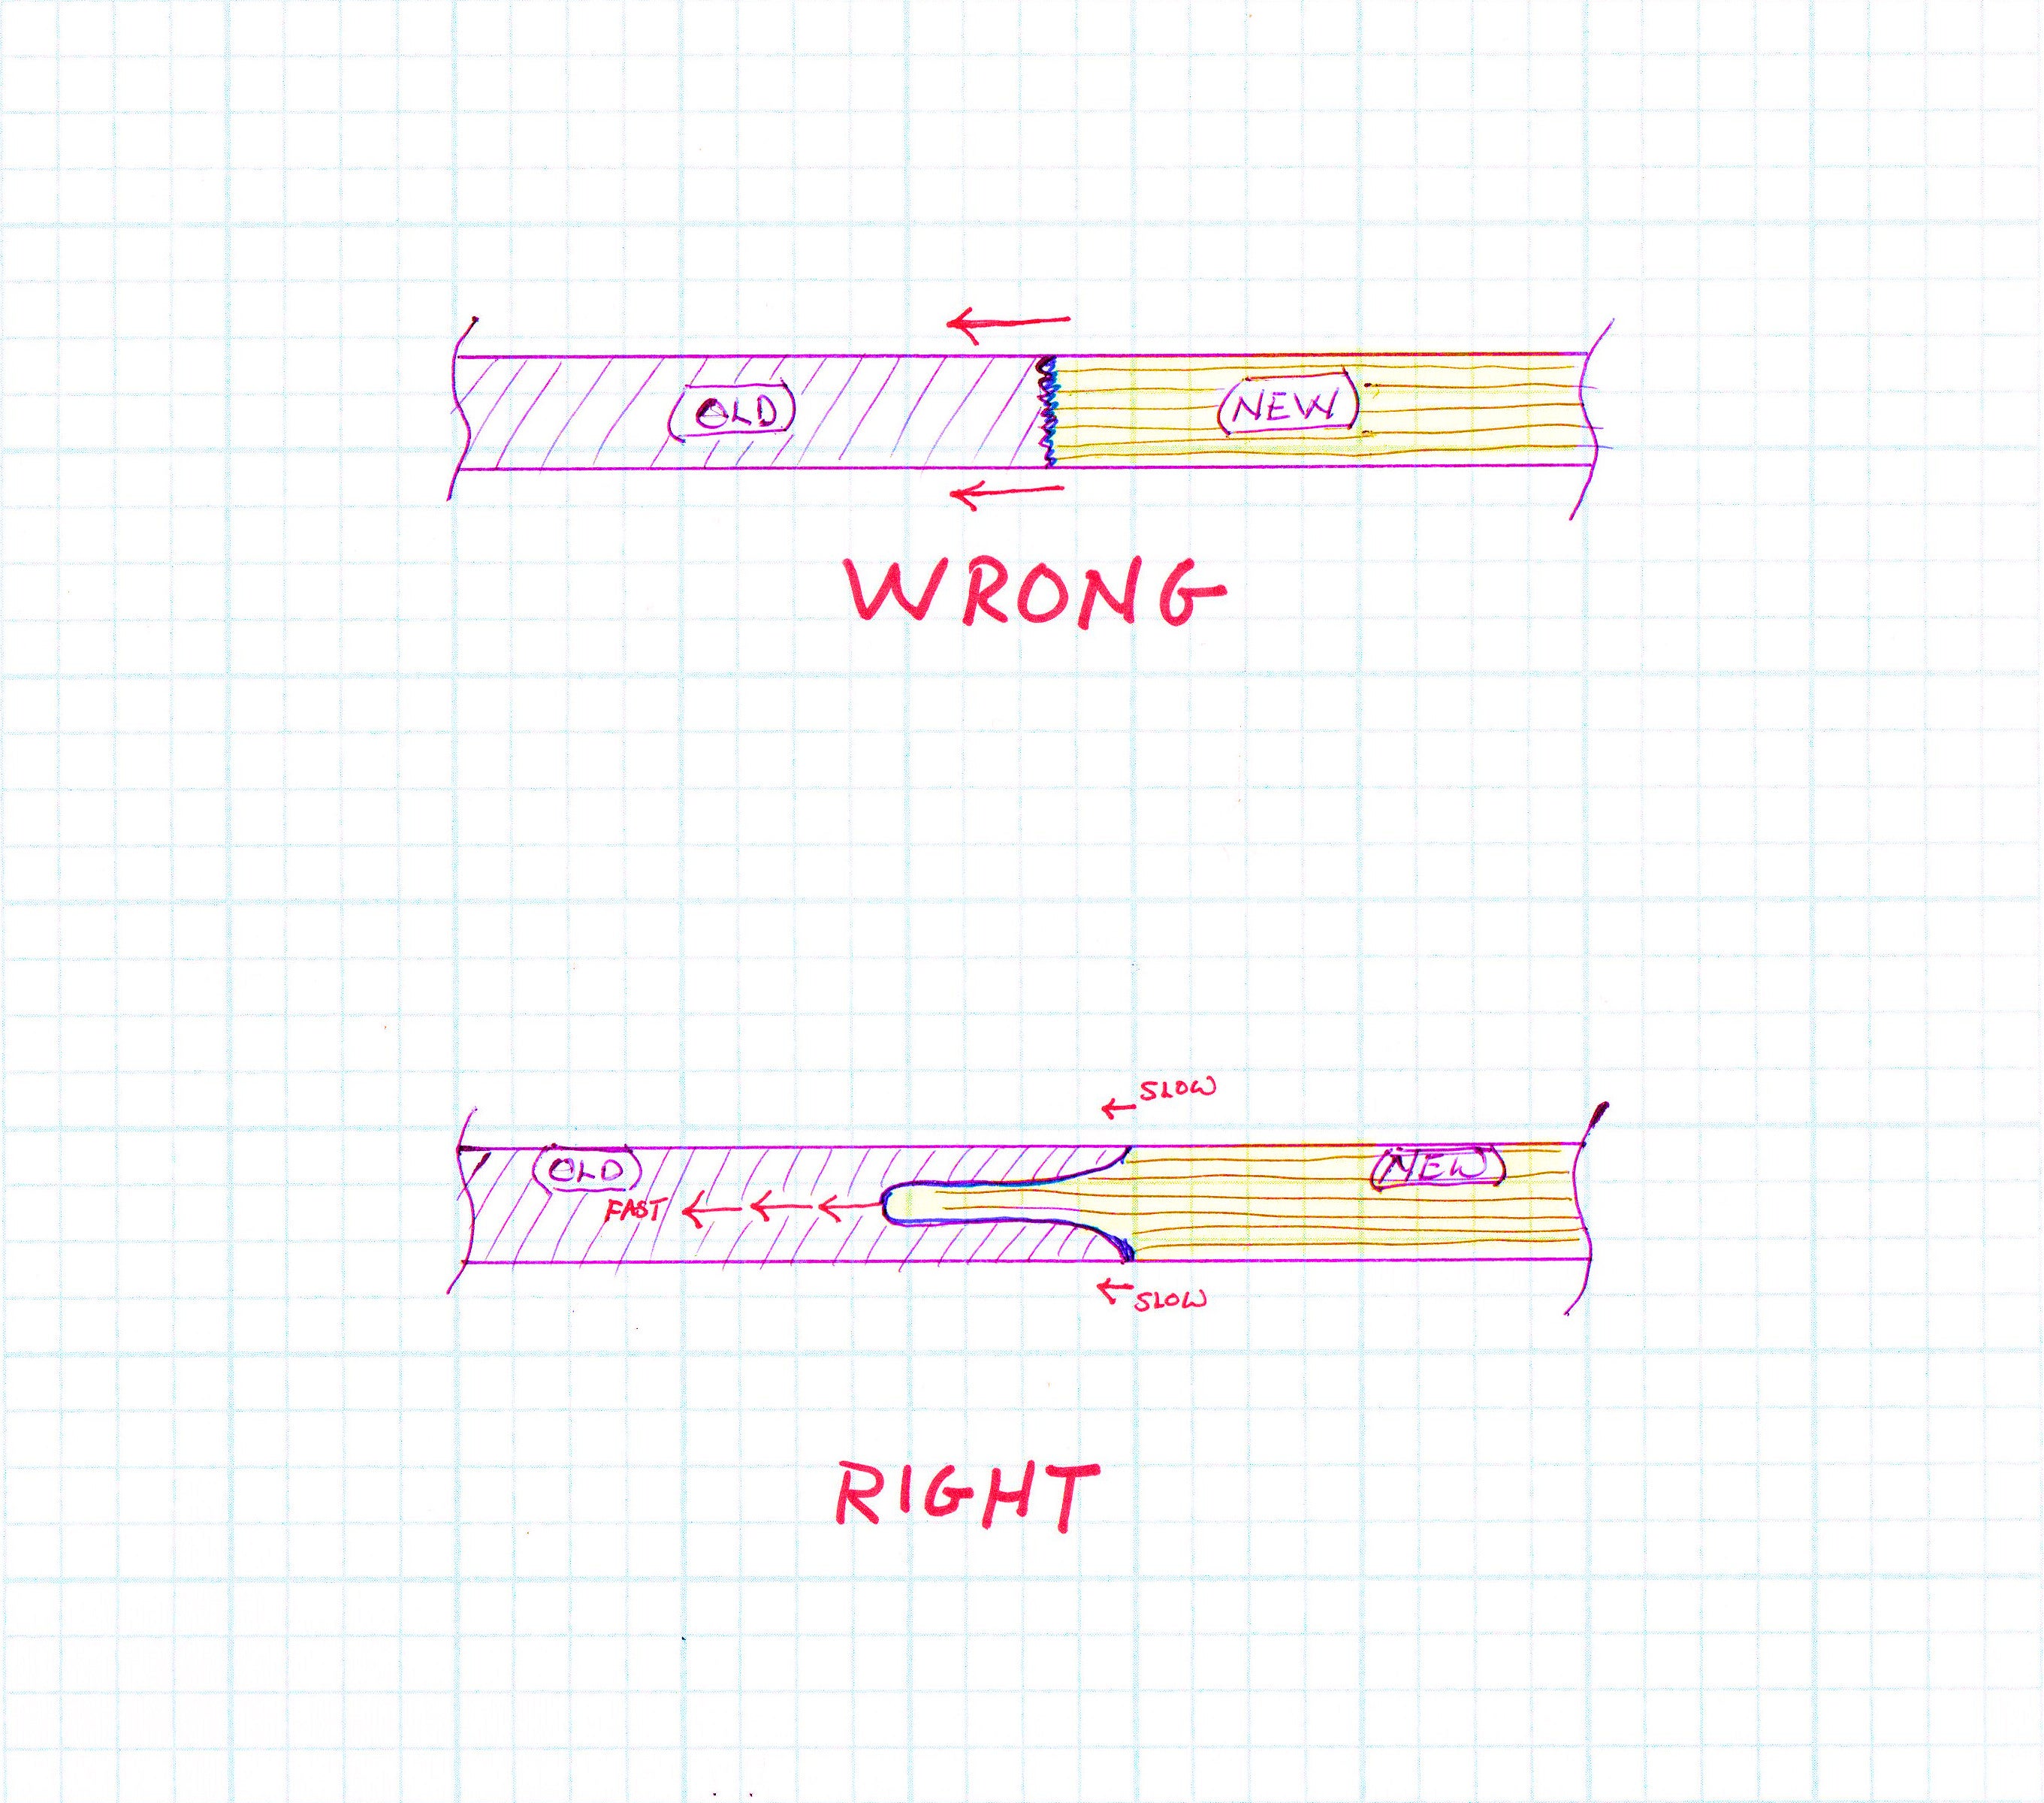
- Fluid does not move through a tube or a vessel in an even, straight way. Fluid near the center of the tube or vessel moves faster than the fluid near the wall. (In fluid dynamics, we say that as you get closer to the wall of a tube, the rate of flow approaches “zero”.) So, when you start to see “fresh” fluid during a typical brake “bleed” operation, you are likely not seeing 100% fresh or clean fluid. It has most certainly come from the center of the system, leaving behind an appreciable amount of “old” or “dirty” fluid behind along the walls of the tubes and components of your brake system.
Bottle on Left was thought to be clean until compared to the subsequent fluid extracted from inside bleed valve. (Bottles were marked in ounces so that the amount of fluid removed from the Master Cylinder could be determined without having to check multiple times at each bleed valve.)
Then compared to virgin, new brake fluid in bottle, fluid amounts below are based on obtaining fluid that NEARLY matched the virgin fluid in color.
The Power Bleeder that this author used was found to not be reliable in transferring fluid from the Power Bleeder tank to the Master Cylinder without leaking significant amounts of fluid. (Determined on a different vehicle!) Additionally, if a Power Bleeder is not available, the end-user will have to fill the Master Cylinder in the traditional method anyway. As such the Master Cylinder was filled “manually” and then the Power Bleeder was used strictly as a pressure vessel to pressurize the brake system and facilitate a “One-person operation”.
The fluid in the Master Cylinder should never be allowed to run too low, if this is allowed to happen, air will be introduced into the brake system and MUST be removed for a properly operating brake system.
The amount of fluid that can be safely pushed through the Master Cylinder (Ref: Challenger HC) was determined to be 8-10oz when starting with a COMPLETELY FULL Master Cylinder. (Full to the TOP of the Master Cylinder, above the “MAX” fill mark). This author accidentally pushed 12oz through once due to a bleed valve left open, while this did not introduce air into the system, fluid could not be detected in the Master Cylinder, again, this was starting with a COMPLETELY FULL Master Cylinder.
------------------
Using a LARGE (2oz/60ml) syringe and short section of hose, remove as much old brake fluid as possible from the Master Cylinder. Refill Master Cylinder with new desired fluid. ALWAYS take great care to prevent ANY brake fluid from touching any cosmetic surfaces, primarily any exterior painted surfaces as brake fluid will strip away paint leaving a damaged area!
Starting with the Right-Rear brake caliper and then moving progressively around the vehicle as indicated below, bleed the following amounts of fluid evenly and in an alternating fashion from each of the calipers two bleed screws, the following amount of fluid. Keep in mind that with the first caliper, you’re doing the initial flush of the majority of the brake system, from and including the Master Cylinder to the caliper.
Right rear 32+ oz,
Left rear 16-20 oz
Right front 16-20 oz
Left front 16 oz.
----------------------
These amounts were determined by purging or flushing enough brake fluid through a 2016 Challenger Hellcat’s brake system to get fluid that nearly matched NEW fluid as shown in the images above. Note that without the comparison of new fluid in the matching container it had been originally believed that after only a comparatively small amount of fluid (6-8oz), that the fluid was believed to be “NEW”. Even after what seemed to be an excessive amount of fluid, only by directly comparing the bled fluid to the new, virgin fluid, was it apparent that the bled fluid was still “dirty”.
Of Note: The effect of the ABS components and any fluid trapped within them is not considered here.
Also of Note, it would be essentially impossible to get truly 100% virgin brake fluid throughout the system utilizing this method. The affects of wall friction and turbulence in the system will prevent this from happening. It comes down to a matter of economics and time. Each individual will need to decide how much effort and money they are willing to expend to achieve the desired results. I actually flushed the system THREE times. The initial time was to flush the old, dirty fluid out utilizing generic DOT-3 fluid. It was during this effort, where the change in color was obvious, that I was able to determine how much fluid was required to achieve the desired results. The second time I repeated the process utilizing a comparatively low-cost DOT-4 fluid, admittedly with lesser fluid amounts at each corner. The third time was with a premium DOT-4 fluid (Wilwood EXP 600) where I returned to the originally determined amounts. It is my intention to repeat the process either in 12 months or after any extended, competitive driving, whichever happens first.
-
 8
8
-
 4
4
-
 2
2
-
 1
1
- Show All